SCVMM and MS Private Cloud Configuration
After VMM System Center installed successfully, I will walk you through the steps for configuring the System Center and Create Microsoft private cloud.
1 – CreateRunAsAccount
Let’s create a “RunAsAccount“then we will use in many steps in addition you do not have to provide administrator password to administrator candidate while he/she is helping you and they do not have to wait for you to enter the password.
Login to SCVMM, click Home Tab, then settings — > Create Run AS Account

Provide name for runas account and for domain account with appropriate permission
As a best practice create a domain account (service account) first and then use this account while creating the RunAs account

Account created and Administrator Role assigned

2 – Create Host Group and Add Hyper-V
Click Home Tab, then “VMs and Services” — > All Hosts — > Create Host Group

Host group created; now let’s add Hyper-V hosts to this group. Later on we will add Citrix XenServer and VMware ESX and manage cloud with mixed hyper visor servers
Click Home Tab, then “VMs and Services” — > All Hosts — > Host Group (Toronto) — > “Add Hyper-V Host and Cluster”

The Add Resource wizard will start

Now provide (use) the RunAsAccount created earlier, of course you can manually enter user with a proper privileges, but for best practice RunAsAccount recommended

Click brows and select the RunAsAccount account


You can query AD for host names that we want to manage by VMM or type Host name, IP 
From discovered list we will select the computers we want to add as host

Assign the hosts to the host group and re associate hosts with VMM environment

Confirm the setting and click finish

From Job window, you can see the process and after process completed it will ask to restart the host

The hosts added to the host group, right click and restart

3 – Create Logical Network
Next step is to Create Logical Network and associate IP Address, VLAN…
Click Home Tab, then “Fabric” — > Networking — >” Create Logical Network”

Specify Name for the Logical Network and select the option you can create a VLA, PVLAN but at this stage I will create a network site that are routable and can be used as a single network

Configure Network site, select the Host Group and IP subnet and VLAN’S
Click Next to create the Logical Network

From Job window, you can see the process status

4 – Create VMNetwork
If you are familiar with VMware, VMnetwork is like a port Group in VMware
Click Home Tab, then “VMs and Services” — > VM Network — > “Create VM Network”

Specify a name for vm network and select the logical network created earlier
Note: we have only on logical network, but in production environment you may have more
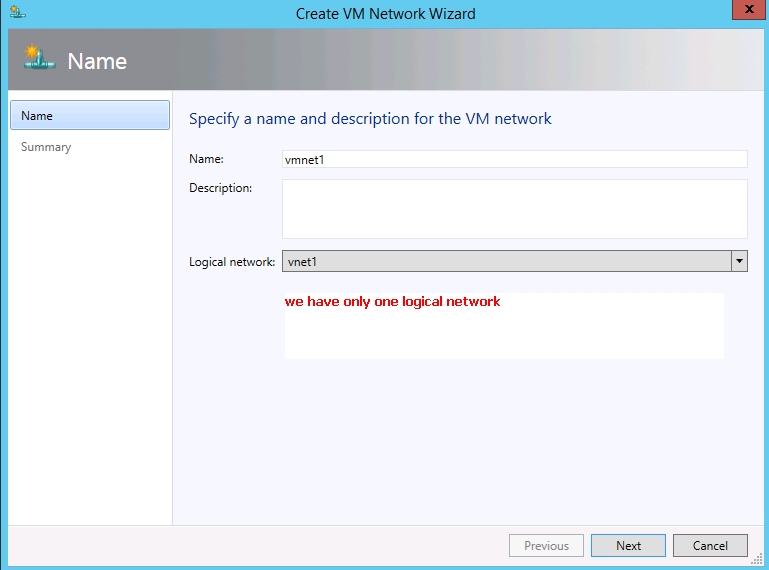
Confirm the setting and click finish

5 – Create IP Pool VMNetwork
Now we are getting closer to create private cloud, but before that we have to complete a few more steps
Since Logical Network and VM network created, next step is to create IP Pool
Click Home Tab, then “Fabric” — > Networking — > Logical Networks — > right click on the network (vnet1) then click “Create IP Pool”

It will Launch the IP Address Pool wizard, Specify IP pool name and select the logical network

You can create a new network site or use existing one created earlier

Specify IP address range from subnet, is this wizard looks familiar to you? Yes it is like a DHCP configuration, you have to specify IP Address, GW, and DNS
But with difference that there is no IP Address lease period, this IP assigned to vm and there is no expiration

Specify Default gateway, DNS server address and DNS suffix


IP Pool created, and you can see the created IP Pool under Logical Network

6 – Add Storage Device
Microsoft Private Cloud support different storage type and provider, support SAN, NAS, FC managed by SMI-S and windows based file server

In my lab environment I will use Microsoft windows 2012 iSCSI Storage (in addition to physical SAN, NAS, etc… you can use any virtualized SAN storage StaWind, HP LeftHand, etc… as explained earlier), and for managing protocol SMI-S WMI

Click next to discover and Gather Storage Device Information.


Select the storage pool to manage

Create classification and assign to storage pool,
Technical name or description (SSD, 15 SCSI or SATA) doesn’t mean anything for end users, instead that is why you create classification (platinum, Gold, Silver, Etc…) and charge the user acceding to resource usage.


Confirm the setting and click finish to add the Storage Device

The Storage Device is added, you can see the storage information and status from Storage– > providers

7 – Cluster
Cluster is not a mandatory requirement to create private cloud, but is necessary for fault tolerance and business continuity.
In order to create a cluster, you should have at least two hosts, and shared storage

Create disk for storage and quorum disk on your SAN; permit access from both Hyper-V hosts.
You can create 1 GB size disk for quorum disk

Login to Hyper-V host and make sure that both storage and quorum status are offline, if it is online right click and click “Take Offline”
Note: partition must be “Unknown”; if it is not “Bring Online” then “Reset Disk” and “Take Offline”


Now you are ready to create a Hyper-V Cluster
Click Home Tab, then “Fabric” — > All Hosts — > Create — > “Hyper-V Cluster”

Create Cluster wizard will launch, name the cluster and select RunAsAccount

Select the Hyper-V Hosts that participate in the cluster from available hosts and select the Host group

Click “Next” to continue

Enter the IP address for the cluster; you can enter static IP address or select static IP Poole that created earlier.
I will select the IP Pool”ITmug IP Pool” then click “Next” to continue

Select disks for the cluster, SC is a smart enough to select the disk that will use as a quorum disk
Make sure to check CSV (clustered shared volume) for storage/vm disks then click “Next” to continue

Confirm the setting and click finish to create cluster; you can view and save the scrip for future use (Automation)

HVC Cluster Created, depending on your virtualization infrastructure you can create ESX and XenApp clusters.

8 – Create Cloud
Until now we build the blocks requited to build private cloud, next few steps are to create the cloud
Click Home Tab, then “VMs and Services” — > All Hosts — > Host Group (Toronto) — > cluster (HVC) — > “Create Cloud”

Create Cloud wizard will launch, name your private cloud (ITmugEC) then click “Next” to continue

Select resource for your cloud, since we are in a lab environment and we have only one host group with two Hyper-V hosts
Select host group and click “Next” to continue

Select the logical network for this cloud

At this stage I will not select network load balancer it is out of the scope for this post; in another post I will walk you through advance configuration,

Click “Next” to continue, in another post I will walk you through advance configuration and multi tenant network but it is out of the scope for this post;


Select the storage and specify Library for vm path


Select the capacity; select “Use Maximum”; unless you have a reason not to use

Select capability profile for your cloud, I will select the build-in Hyper-V profile,
You can select a custom profile if you have (created earlier)

Confirm the setting and click finish to create cluster; you can view and save the scrip for future use

Cloud created..
Click Home Tab, then “VMs and Services” — > cloud and you can see ITmugEC cloud


